Multiple PHP Versions
If you want to run multiple versions of PHP on your server (for example, to keep a live site going with an older version and test an upgrade with a newer version), these instructions should help.
If you are unfamiliar with the terms webroot, YOURACCOUNT and YOURSITE, please see basic terms.
First, you should verify that the desired PHP Version is available on your host.
Some hosting configurations allow only one version of PHP per domain; others permit multiple versions of PHP. Before proceeding, determine whether your hoster allows you to have multiple versions of PHP per domain (generally by using a .htaccess file).
Creating a test site under your domain
If your hoster allows you to control the PHP version on a per-folder basis,
you may use that technique, and deploy your test site to a different folder under public_html. We’ll assume the name of this folder is test. Here is how things would look:
- If your live site is directly under
public_html, put your test site in a subfolder underpublic_htmlnamedtest. So your live site would be accessed ashttps://www.YOURSITE.com/and your test site would be accessed ashttps://www.YOURSITE.com/test/. If you use URL Rewriting, you may need some changes to your.htaccessfile. - If your live site is already in a folder under
public_html, put your test site in a differently named folder. For example, if your live site is in the folderstore, your live site would be accessed ashttps://www.YOURSITE.com/store/and your test site would be accessed ashttps://www.YOURSITE.com/test/.
Alternately, you may create a new subdomain and follow the steps below (for better separation of test and live). You would use the .htaccess file to set the PHP version, in lieu of using MultiPHP or a similar tool.
Creating a test site under a new subdomain
Create an alternate webroot
With cPanel’s File Manager, navigate to /home/YOURACCOUNT/. This is known as “above webroot.” If your cPanel File Manager loads with /public_html, just click on “Up One Level” to be “above the root.” This is where you will place your test site. Create a folder called “test” to hold the contents of your test site.
Create a Subdomain.
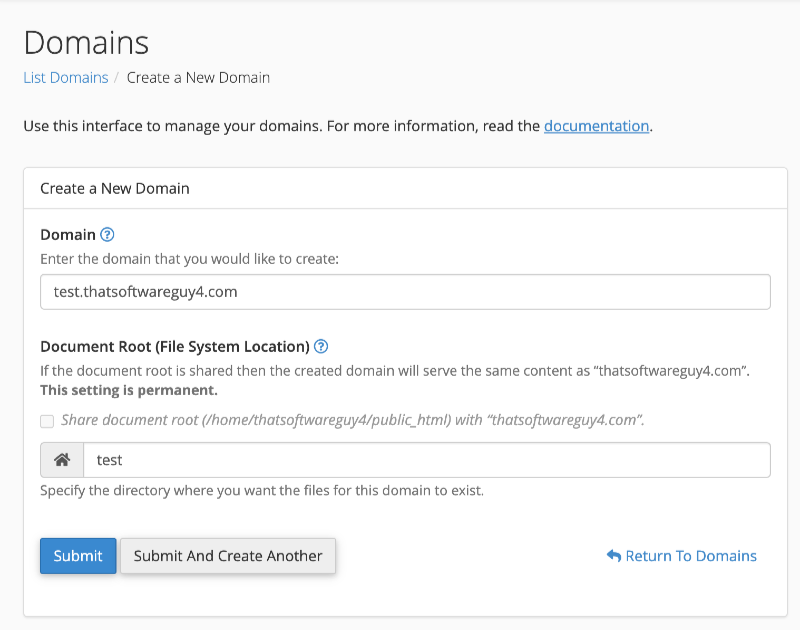
In cPanel, navigate to the Domains Section. Click the icon called “Domains.” Then, click on the “Create a New Domain” option.

We now need to create the subdomain test.
In the Domain block, make sure the domain is showing test.YOURSITE.com.
Make sure the Share document root is not checked, and that the folder we just created is specified in the text field below. Click Submit.

You now have a subdomain of test.YOURSITE.com ready to be set up.
Set the PHP version for the Subdomain
If your cPanel does NOT have a Software Section with a selection of MultiPHP Manager, you may need your host’s help on this step. Ask your host to set the PHP for the test folder that you created. (Emphasize that it is above webroot, i.e. in /home/YOURACCOUNT/test.)
If you do have MultiPHP Manager, go to the Software Section in the cPanel and open MultiPHP Manager. Set the PHP version appropriately.
-
If
test.YOURSITE.comis not already listed with the needed version of PHP, select the box in front oftest.YOURSITE.comand select a version of PHP in the drop-down titled PHP Version above the listing area. -
The PHP version you select should be the latest supported version that works with your version of Zen Cart. The PHP Version Matrix will show you the versions of PHP that work well with the version of Zen Cart you are testing.
For instance, with Zen Cart 2.0.1, you could use PHP 8.0, 8.1, 8.2 or 8.3. See Server Requirements for running Zen Cart for other versions.
Install your new site
Upload your software to the folder /home/YOURACCOUNT/test.YOURSITE.com/. Be sure the two configure.php files use this folder as DIR_FS_CATALOG, and that all of the HTTP*_SERVER settings use the subdomain URL, not the main domain URL. For example,
define('HTTPS_SERVER', 'https://test.YOURSITE.com');
Tweak your Configure Files
You’ll have to tweak your configure files as shown below.
includes/configure.php
define('HTTP_SERVER', 'https://test.YOURSTORE.com');
define('HTTPS_SERVER', 'https://test.YOURSTORE.com');
define('DIR_FS_CATALOG', '/home/YOURACCOUNT/test/');
admin/includes/configure.php
define('HTTP_SERVER', 'https://test.YOURSTORE.com');
define('HTTP_CATALOG_SERVER', 'https://test.YOURSTORE.com');
define('HTTPS_CATALOG_SERVER', 'https://test.YOURSTORE.com');
define('DIR_FS_CATALOG', '/home/YOURACCOUNT/test/');
And both files will probably have
define('DIR_WS_CATALOG', '/');
define('DIR_WS_HTTPS_CATALOG', '/');
since you’ve put the files in the test folder just above webroot, rather than a subfolder under test (even if your live store is in a subfolder).
Check your SSL
You may need to take steps at this point to get your SSL certificate for your new subdomain. On cPanel, go to SSL/TLS Status, select your new domain and run AutoSSL.
Verify your Installation
- Login to your admin, then go to the Version page. Check that the configuration you see matches your expectations.
- PHP Version (can be updated in cPanel’s MultiPHP Manager)
- PHP Memory Limit (can be updated in cPanel’s MultiPHP INI Editor)
- Place an order and then check the
/logsfolder to be sure everything is ok.